
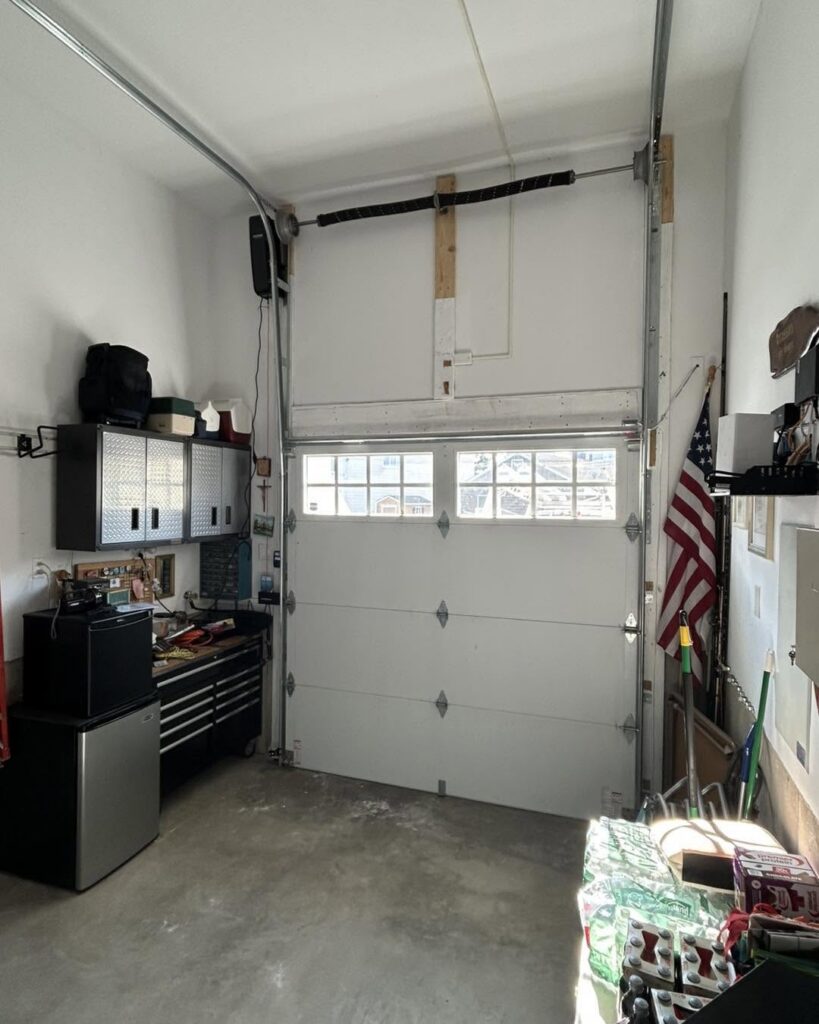
A Lavallette homeowner came to us with an unusual problem. They were installing an elevator lift at the back of the garage to reach the living space above. The garage door tracks ran right through the spot where the lift needed to go.
The door itself was in good shape. Only its path needed to change. Paul Sharpe converted the existing door to a high-lift setup in a single day. Here is how the job came together and when a conversion like this makes sense.
Standard Tracks Take Over the Ceiling
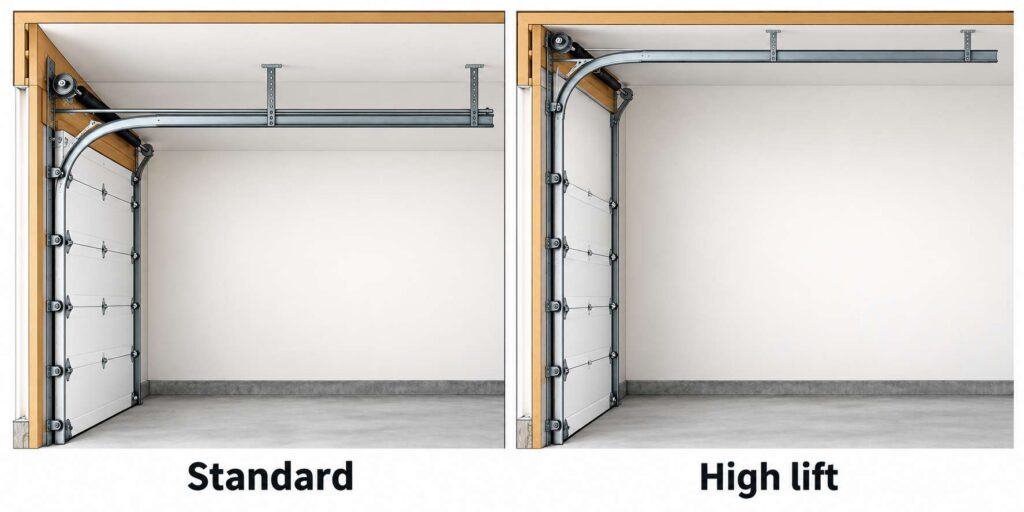
A standard garage door rolls up and back along horizontal tracks. When it opens, the door hangs flat just below the ceiling. The tracks, the opener rail, and the door all claim the space between the header and the back wall.
Most homeowners never think about it. But that overhead zone is exactly where a residential elevator, a car lift, or tall storage racks need to go.
This garage has a 165-inch ceiling, or 13 feet 9 inches. The door is 8 feet tall. That left plenty of unused height above the opening. The problem was the old tracks. They turned back toward the rear of the garage just above the door and blocked the lift.
What a High-Lift Conversion Does
A high-lift setup makes the door climb straight up the wall before it turns back toward the ceiling. Instead of curving into the horizontal track right above the opening, the door keeps rising.
On this job, the door now travels about 5 feet higher on the wall before it turns. The horizontal track sits up near the ceiling, well clear of the lift. The space below it is open again.
Keeping the Original Door and Track
We reused the homeowner’s existing door and track. Paul added a connecting section between the vertical and horizontal track at the new height. That extra piece is what gives the door its added lift.
Keeping the door saved the cost of a full replacement. It also meant no waiting on a new door order.
New Springs, Cables, and Bearings
A door that travels farther needs a counterbalance system built for that travel. We replaced the torsion springs, lift cables, and bearings to match the new setup.
This part is never a DIY project. Torsion springs store enough tension to cause serious injury. A high-lift conversion means releasing that tension and setting it again from scratch. It’s one more reason homeowners should skip the handyman for garage door work.
Why the Opener Moved to the Wall
A standard opener hangs from the middle of the ceiling. It pulls the door along a rail that runs back from the header. With high-lift track, that rail would block the same space the homeowner wanted to clear.
We installed a LiftMaster 98022 wall-mount opener instead. It mounts beside the door and turns the torsion shaft directly. Nothing hangs from the center of the ceiling.
The 98022 also brings features that suit shore homes:
- A quiet DC motor with very little vibration
- Built-in Wi-Fi and phone control through the myQ app
- Integrated battery backup that keeps the door working during a power outage
- A remote LED light that can go anywhere in the garage
Battery backup carries extra weight on the barrier island. Nor’easters and summer storms can knock out power for hours. In a home where the garage leads to the elevator, the door has to keep working. You can compare wall-mount, belt-drive, and other options on our garage door openers page.
One Day on Site
The full conversion took one day. A typical high-lift job follows this order:
- Remove the old opener and safely release spring tension
- Install the new track sections at the higher position
- Fit new springs, cables, and bearings
- Mount and wire the wall-mount opener
- Balance the door and test the sensors, force settings, and auto-reverse
- Walk the homeowner through the app and the manual release
The homeowner kept the door they already had. They gained a clear path for the lift and a quieter, smarter opener.
Is High Lift Right for Your Garage?
High lift works when there is real height between the top of the door and the ceiling. The more room you have, the more lift you can add. Paul measures headroom, side room, and the wall above the header before recommending it.
A conversion is worth a look if you want to:
- Install a car lift or vehicle stacker
- Add a residential elevator
- Hang tall overhead storage racks
- Raise ceiling lights or add a fan
- Open up height for a home gym
Many homes in Lavallette and along the barrier island sit raised, with living space well above the garage. Those tall garages often have height nobody uses. A high-lift conversion puts it to work.
Some garages need more than a conversion. A door worn down by salt air may be better replaced with one built for high lift from the start. Our garage door replacement page covers those options.
Common Questions About High-Lift Conversions
Often, yes. The door and track need to be in good condition, and the ceiling needs room above the opening. Paul confirms both during the estimate.
Usually. A ceiling-mounted opener and its rail sit in the space you are trying to free up. A wall-mount opener keeps the ceiling clear.
This Lavallette job took one day on site. Most conversions follow a similar timeline.
Get More Room From the Door You Have
Every garage is built a little differently, so the first step is a free on-site estimate. Paul will check your ceiling height, door, and springs. Then he’ll explain your options in plain terms. You get a written quote before any work begins.
Paul is a career firefighter in Newark and a volunteer with the Silverton fire company. Safety testing is part of every job before he signs off.